Batter Up


Batter Up
 

State Standard: 1, 3, & 4

Equipment: Mats, Cones, long-handled implements, and balls. Grade: 3-5 (K-2 possibly)
Purpose of Event: Striking with a Long-Handled Implement (S1.E25), Fielding/Catching a batted ball (S1.E16)
Time: 18-25 minutes


Organization: Place mats for boundaries between ‘batting cages’ facing a long wall for more space to use and hit into (dependent on your gym size). Place hitting tees or large pylons to hit from (students can have the option to throw and hit their own ball). Across from the hitting tees, place another pylon as the ‘base.’ (Feet poly spots are optional for hitters)

Description:

The batter hits the ball into the ‘field,’ drops the bat, runs to the ‘base’ (pylon), touches the pylon with their hand, and then runs back to the batting tee (home) and touches it.

The fielder retrieves and returns the ball to the batting tee (home).

SAFE = If the batter gets to the ‘base’ and back ‘home’ first, the batter is SAFE.

OUT = If the fielder retrieves the ball and touches ‘home’ first OR they catch the ball before it hits the ground, the batter is OUT.

The batter then goes to the back of the fielder line. The fielder then becomes the next batter.

Variations:

  • Make the playing area bigger or smaller depending on grade level and ability
  • Make the batter run to the base and back more times
  • Make the fielder do an exercise before they have to get the ball
Concerns: Review how to keep your eyes up to ensure you will not run into another fielder or batter. Cannot obstruct another field or batter’s way to the ball or base. RPS if there is a tie at home
This idea is from Matt Eichel, a Physical Education Teacher at St. Ignatius School. 


Noodle Activities


Noodle Activities
 

State Standard: 1, 3, & 4

Equipment: Several Pool Noodles (long and short) for each student Grade: K-3
Purpose of Event: Balance, Chasing, Fleeing, Teamwork
Time: 18-25 minutes

Organization:
  Give each student their own pool noodle. 
Activities:

Noodle circles—-
Clap Game
      depending on grade, start with 2 or 3 (k,1,2)
      hold together with both hands, ends facing out
      throw in the air, clap, and catch only with your hands
      2 times in a row = getting one more from bucket
      must be verified by the partner
Walking Balance Game
      depending on grade, start with 2 or 3 (k,1,2)
      have them balance noodles on a body part and walk around
      top of head, back of hand, chicken wing elbow, etc
 
Resting Balance Game
      in a group of 2 or 3, one person lays flat on the back
      others go to bin one at a time and grab one circle
      carefully place the noodle on the resting person’s forehead wtih only one hand
      once it’s on, can’t touch it or move it
      repeat until it falls
 
Skyscraper
      same as above, but place noodles on the floor instead
Noodle Sticks—
Leaning Tower
      sticks that have ends that are angled 
      face partner, each has a stick, extend sticks to touch ends
      hold it with your right index finger next to your right leg (upright)
      partners say, ready to go, then release their noodles to run forward to catch their partner’s stick before it hits the floor
Ankle Biter
      same sticks as above
      face partner, each has a stick, extend sticks to touch ends
      that is your invisible circumference circle
      move about that circle trying to hit your partner’s ankles or shoes
 
Hornet Tag
      same sticks
      throw 4 or 5 sticks on the floor
      everyone vs. everyone, use the entire gym
      whoever wants to be a hornet can pick up a stinger(stick)
            off the gym floor.
      They chase and tag someone from the knee down, only
      after success, they drop their stinger and run away
      a person who got stung cannot pick the stinger that stung them
      they do whatever exercise you list for being stung, then resume the game
      you can pick up a different stinger after using one, but NO ONE has to pick up a stinger to become a hornet…it is optional

Concerns:

Be safe! Do not run into one another. 

This idea is from Jon Peterson, PE Teacher Robert Frost Elementary


The “Death Star”


The “Death Star”
 

State Standard: 1, 3, & 4

Equipment: Cageball (or Fitness Balls) and Playground Balls.  Grade: 3-5 (K-2 possibly)
Purpose of Event: Throwing at moving targets & Teamwork
Time: 18-25 minutes


Organization:  Divide the class into two teams and have them line up along their chosen sideline. Mark an area about 30 feet wide across the center of the playing area, with the cageball aka “Death Star” in the center.

Description: “Death Star”: The two teams are the Dark Side vs. The Force. In May, we play this game for “May the 4th Be With You.”  The game’s objective is to throw the playground balls at the Death Star (Darth Vador’s Spaceship), forcing it across the line in front of the opposing team.  Rules: Players may come up to the line but cannot move into the center area, and no one is allowed to touch the Death Star at any time. If balls become caught in the center, students can go retrieve a ball, but they must return to their throwing zone. If the Death Star crosses over to the opposing team’s side, that team wins. The game stops, and that particular team must perform an exercise. The game starts over with the Death Star starting back in the middle of the gym. 

Variations: We use the Yoga Balls with medium-sized gator-skin balls for K-2 students. For 3-5 grades we use the cageball with playground balls.

Instead of just one cageball/yoga ball have multiple (5-6). More opportunity for students throw at the Death Star.  

Concerns:

  • Be safe while throwing the balls. Students are not allowed to throw the balls at one another. Students need to be aware of the ricochet from the playground balls off the cageball.
This idea is from: 


Moneyball


Moneyball
 

State Standard: 1, 3, & 4

Equipment: Several basketballs, crates/buckets, and play money, & several Poly spots. Grade: 3-5
Purpose of Event: dribbling, shooting, teamwork, and adding skills
Time: 20-25 minutes

Organization:  Divide the class into four teams. Each player needs a basketball. Set up several poly spots (depending on how many students you have) around the shooting lanes on the basketball court. If you have four basketball hoops, you need to set up poly spots at each hoop at different spots. You can use buckets and/or milk crates (this will be the team’s bank to put their money in).

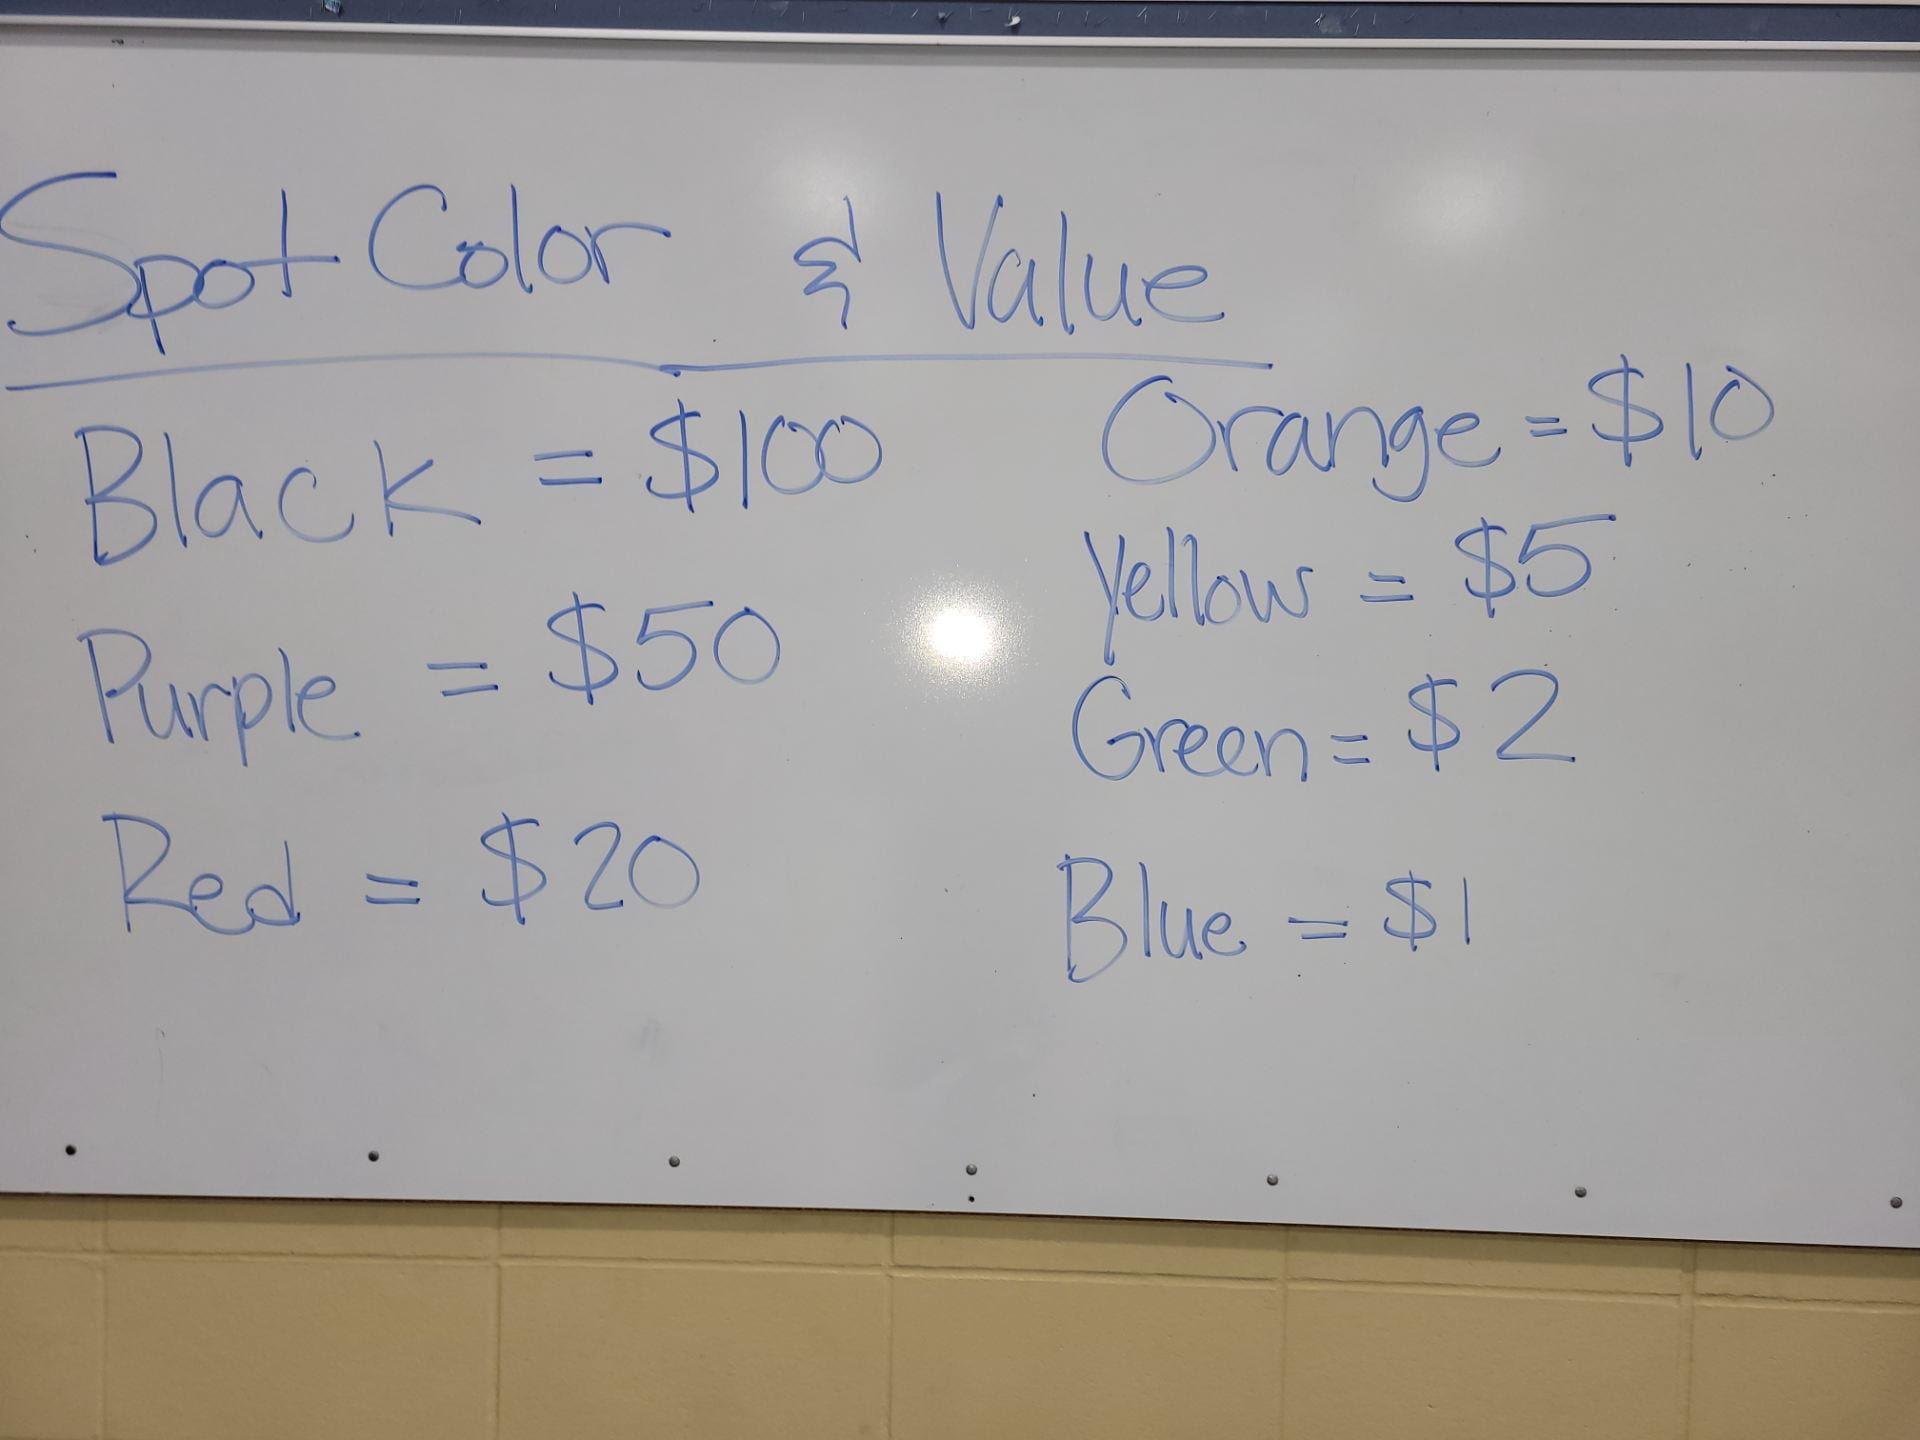
Description:  After the teams have been distributed, On the signal, each player will dribble their basketball and attempt a shot at one of the poly spots. If the player makes their shot, they will look on the whiteboard (see the picture below) to see how much that specific color is worth ($$). They will then go to the cart, grab the money, and put it in their team’s bank account (buckets/milk crates). Then they will attempt another shot to keep gaining more money for their team. The activity continues until all the money is gone or time is up. After the activity has ended, each team will put their basketballs away and go and add up the amount of money they earned. The team with the most money wins.


Concerns: Be safe while shooting the basketballs (make sure nobody is under the baskets). No cheating!!!! 
This idea is from My student teacher Miss Zimbeck


Hit The Spot


Hit The Spot

State Standard: 1, 2 & 3

Equipment: Ball (nerf) and poly spot per pair of students Grade: K-5
Purpose of Event: Work on throwing under and over hand, Hand-eye coordination, Timing, Aiming, & Teamwork
Time: 15-20 minutes
Description:
Line up students in a double line about 10-15 feet apart, facing their partners. Place a poly spot between them. Objective is to throw the ball and have it hit the spot.

Each of these 5x’s and then continue to next, can also switch partners if you would like: Start by having the students standing and throw; then Jump up and throw while in the air; 3 steps and throw; 3 steps jump and throw. (Even with the steps, they should still be 10-15′ from the poly spot.) Increase distance as skill improves.

**Could be a possible station activity for K-2 students.**

Concerns: Have lots of space between pairs
This idea is from: WOW Workshop

T.E.A.M Field Day 2018


Youtube Tutorial

Below is a tutorial I made demonstrating how I create my Field Day maps for my teachers/staff each year!!! Check  it out!!!


Volleyball: Passing Skills


Volleyball: Passing Skills

State Standard: 1, 3, 4, & 5

Equipment: Volleyball per pair of students
Grade: 3+
Purpose of Event: Learning correct passing form (volleyball).
Time: 10-15 minutes
Description:

Hands:

  • Interlock           Looks like your praying with fingers intertwined
  • Overlap            One hand on top of other, thumbs side by side

Body: Loaded Position:

 Low, knees bent, shoulders over feet, right foot in front, arms extended out

 Back is straight

Contact:

Contact is made with the forearms not the thumbs or bicep

Contact is made when body is in loaded position

Progression:

  • Toss (throw) to partner who is on knee; Partner on knee will catch the ball with arms extended (10X’s)
  • **Toss should be with 2 hands and under control (rainbow)
  • Toss to partner on knee and pass back (10X’s)
  • Switch and repeat
  • Standing
  • Toss to partner who is standing they will catch the ball with arms extended (10X’s)
  • Toss to partner who is standing and pass back (10X’s)
  • Switch and repeat
  • Pass Continuously back and forth UNDER CONTROL
  • Start each time with a toss to your partner
  • May touch floor after each pass
  • Count how many passes you make

 Activities:

  • Cooperative Wall Volley
  • Groups of 3-4 and one ball
  • Pass ball against a wall, then go to the end of the line
  • The next person must pass the ball back to the wall after the ball bounces ONCE on the floor
  • Then eliminate the bounce
  • Continuous Passing
  • Groups of 3-4 and one ball
  • 2 lines facing each other and pass and run to opposite line

Cue Words: Contact in LOW Zone, Back Flat, Move to target, “I

  1. Start this progression on the floor, with a partner.  One person (passer) sits with the right knee down on the floor, and left foot flat on the floor.   Belly Button pointing down allowing the back to be FLAT, arms extended out, but not together, eyes on the ball. The other partner (tosser) stands about 5-7’ away from passer and does a nice easy “rainbow” toss to the passer. 
  2. The passer CATCHES the ball 20-40 times before they actually pass the ball.  Don’t forget to switch after each step, allowing both players to be the passer.  First catch on knee, then pass from knee, then catch standing, and pass standing. Again, doing each 20-40 times.
  3. Hands: DO NOT allow them to Interlock (pray) or One Fist and Wrap, they allow for too many errors and uncontrolled passes.  I want both hands flat (Over lapping), one on top of other, and thumbs folded over (together), if you aren’t sure what this looks like, or why I prefer this, please Ask.  Thumbs should be pointed down to make a nice PLATFORM for the ball to contact.  Contact with the arms should be made just above the wrists and below the elbows on the forearms.
  4. LOOK the ball into the platform and back at the target.
  5. Move both feet to the ball, if one foot goes the other must move also, Call the ball, Say “I”
  6. Contact with ball should be made in LOW Zone,  as low as you can be and still be balanced, do NOT stand up to get the ball.  (About knee level)
  7. Corrections to watch for:  Contact standing up, Contact too high on arms (Move feet back to correct), Contact too low/on thumbs (Move feet forward to correct).
Concerns: Make students are not hitting the volleyball as high as the can in the air. Working together; being good teammates.
This idea is from:


Flicker Ball – Football or Hi-Li or Basketball


Flicker Ball – Football or Hi-Li or Basketball

State Standard: 1 & 3

EquipmentOne football, jerseys Grade: 3+
Purpose of Event: Passing, Catching, Football skills
Time: 15-20 minutes
Description:

Objective: to get the ball into the end zone  (4 teams, 2 half court games)
I pick two kids to rock/paper/scissors to see who gets to start with the ball; the winner picks offense or defense; loser picks side
When holding the ball, you may run (or dribble) until tagged, unless you receive the ball by a turned over, then you can not run
You may not block the thrower
You may block the receiver
If you intercept the pass (catch it in the air)  you may run (or dribble) until tagged
If the pass is dropped , it is a turnover at the spot the ball was dropped
If a team scores, it is handed to the other team they may not run with the ball, until they have completed one pass
If the ball is attempted to be intercepted but the receiver still catches the ball, it is not considered a turn over, play continues

Variations:
-Have boys pass to girls and girls pass to boys, require 3 passes before a score, have 5 people touch the ball before a score,  Have them play other teams every 3-4 minutes switch.

Basketball Style: rule as above, but shooting hoops instead of getting ball to end zone. Can chest or bounce pass.  Once tagged, can continue to dribble (for older students picking up dribble could result in a turn over) If a shot is missed it is a turn over, no rebounding.

Concerns: Touch only or use flags (football style)
This idea is from:


3 Person Continuous Football


3 Person Continuous Football

State Standard: 1, 2, & 3

Equipment: Football or rag foot ball for each group of 3 Grade: 3+
Purpose of Event: Throwing, Catching, Running, Adding, throw a football at a moving target
Time: 15-20 minutes
Description:

Cover correct throwing form, catching. and snapping prior to playing.

Line up the groups of 3 across one end of the gym.  (I use the end-line of the basketball court so that we can run and throw farther.)  In each groups one person starts as the Quarter Back (QB), one as the Receiver (R), and one as the Center (C).

The Center starts with the ball and snaps the ball to the Quarter Back (that is standing about 3-4 feet behind the Center) as soon as the Quarter Back says “HUT”.  At this command, the Receiver runs straight out in front of the group.  The Quarter Back then throws the Receiver the ball.   I have my field divided into 3 zones.  The closest zone worth 1 point, the next worth 2 points and the zone farthest away is worth 3 points.  The Quarter Back and Receiver should decide which zone the Receiver should run to.  Each time the Receiver catches the ball it is worth “X” points, depending on which zone the ball is caught in.  I sometimes give points for touching the ball, even if they don’t catch it, so it will encourage them to go after the ball.  

After the Receiver has they ball they RUN it back to the group and the Receiver becomes the new Center, the Center moves to Quarter Back and the Quarter Back becomes the new Receiver.  Play continues until one team has reach the point goal.  

Goals can be point totals of: 5, 15, 21, what ever works for your class.  Or, keep adding points and if the ball is not caught, loss your points!  Or add points the whole time, and add all of the groups grand total together at the end.

Concerns: Have the Receiver run straight out and back so that they don’t run into anyone, and Run the ball back to the team, don’t throw it.
This idea is from:


Chopstick Pickup


Chopstick Pickup

State Standard1, 2, & 4

Equipment Lummi Sticks, Yarn Balls, Beanbags and Hoops. Grade: K-3
Purpose of Event: Cardiovascular Endurance, Spatial Awareness, Control, & Manipulative’s
Time: 15-20 minutes
Organization: Set up hula-hoops on both ends of the gym. The students will be put into pairs. Each player stands across from their partner in relay style. Each student receives a hoop, 3 beanbags, 3 yarn balls, and 2 lummi sticks.

Description: 
Students will work in pairs. Each student places their hoop on the opposite side of the gym from his or her partner.  The balls and beanbags are placed inside the hoop.  On the signal to begin, each player runs with their lummi sticks to their partner hoop and attempts to use just their lummi sticks to pick up either a beanbag or a yarn ball and return it to their hoop.  


Rules: If a partner drops their item while traveling back to their teammates hula-hoop they do NOT have to go back and try again. 

Concerns: Move safely around the gym. Being safe with the lummi sticks!!!! 
This idea is from: